
들어가며
Template 는 사용자에게 보여지는 화면을 다루는 단계입니다. 기본 구성법과 장고 extend include 태그의 사용법을 공부하고 정리해보았습니다.
Template 구성 시작하기
새로 만든 app의 하위에 templates 디렉토리를 생성해주고 디렉토리 하위에 우리가 보여줄 화면의 기반 골격이 될 base.html을 만들어 줍니다.

base.html은 테스트를 위해 아래와 같이 기본 HTML만 작성해줍니다.
<!DOCTYPE html>
<html lang="en">
<head>
    <meta charset="UTF-8">
    <meta name="viewport" content="width=device-width, initial-scale=1.0">
    <title>Document</title>
</head>
<body>
    Hello world!
</body>
</html>urls.py는 이전과 같이 다음 코드로 구성되어 있습니다.
comments/ URL로 넘어온 것은 views.py의 index 함수로 넘긴다는 의미였습니다.
from django.urls import path
from . import views
from .views import index

app_name = 'comment'

urlpatterns = [
    path('', index, name='hello_world')
]views.py는 다음과 같이 입력해줍니다.
from django.shortcuts import render
from django.http import HttpResponse

# Create your views here.
def index(request):
    return render(request, 'base.html')
서버를 실행하여 새롭게 추가한 app의 url로 들어가봅니다.
python manage.py runserver저는 comments app을 만들고 comments 로 라우팅하도록 urls.py를 입력했기 때문에 127.0.0.1/comments/ 를 브라우저에 입력해보겠습니다.
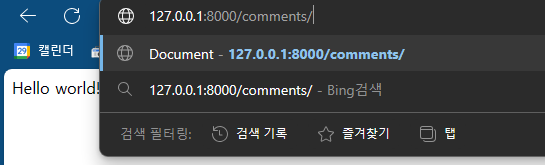
base.html에서 입력한 내용이 views render 함수를 통해 정상적으로 렌더링 된 것을 확인 할 수 있습니다.
장고 extend include
방금 전처럼 base.html에서 모든 태그를 입력해서 간략한 홈페이지를 구성할 수도 있습니다. 하지만 페이지가 조금만 늘어나도 html을 구조화해서 재사용하고 싶어집니다.
이를 구현하기 장고에서는 extend와 include 태그를 제공해줍니다.
Django에서 extend와 include는 HTML 템플릿의 구조와 구성을 관리하는 데 사용되는 템플릿 태그입니다.
include
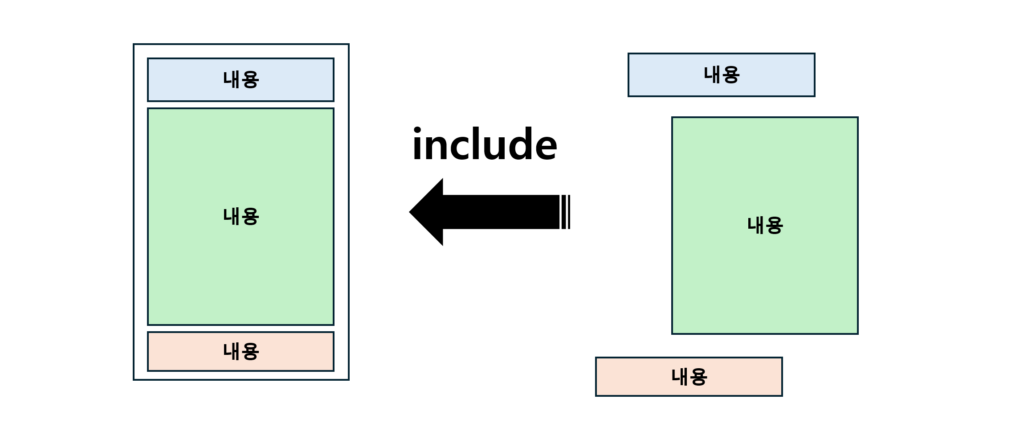
include 태그는 템플릿 내에 다른 템플릿의 내용을 포함하는 데 사용됩니다.
사이드바, 메뉴, 바닥글 등 웹 사이트의 재사용 가능한 구성 요소 또는 섹션에 대해 별도의 템플릿 파일을 만듭니다.
기본 템플릿(예: base.html)에서 include 태그를 사용하여 HTML 구조 내의 특정 위치에 재사용 가능한 구성 요소를 삽입합니다.
이를 통해 코드를 모듈화하고 여러 템플릿에서 HTML 코드가 중복되는 것을 방지하여 코드를 더 쉽게 유지 관리할 수 있습니다.
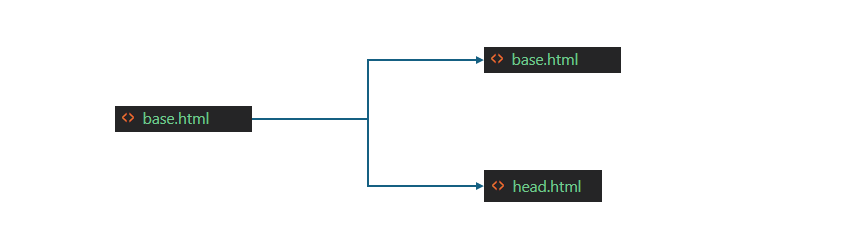
예를 들어, 기존의 base.html에서 head 태그에 있는 내용을 head.html 로 떼어내서 아래와 같은 구조로 만든다고 가정해봅니다.
기존 base.html
<!DOCTYPE html>
<html lang="en">
<head>
    <meta charset="UTF-8">
    <meta name="viewport" content="width=device-width, initial-scale=1.0">
    <title>Document</title>
</head>
<body>
    Hello world!
</body>
</html>
include 태그를 사용한 base.html
<!DOCTYPE html>
<html lang="en">
{% include 'head.html' %}
<body>
    Hello world!
</body>
</html>
include 태그에 들어갈 head.html
<head>
<meta charset="UTF-8">
<meta name="viewport" content="width=device-width, initial-scale=1.0">
<title>Document</title>
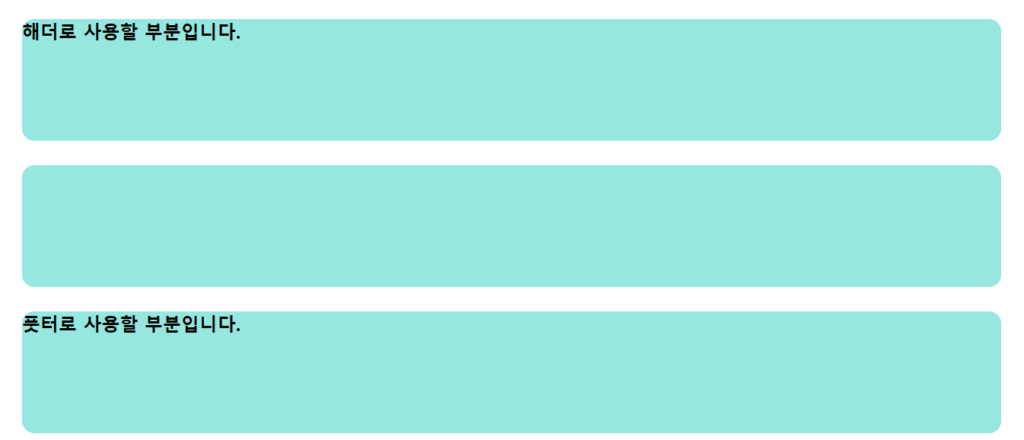
</head>위와 동일한 방법으로 include를 이용해서 header.html와 footer.html을 가져오도록 구성해봅니다.
base.html
<!DOCTYPE html>
<html lang="en">
{% include 'head.html' %}
<body>
    {% include 'header.html' %}
    <div style="height: 10rem; background-color: #97E7E1; border-radius: 1rem; margin: 2rem">

    </div>
    {% include 'footer.html' %}
</body>
</html>
header.html
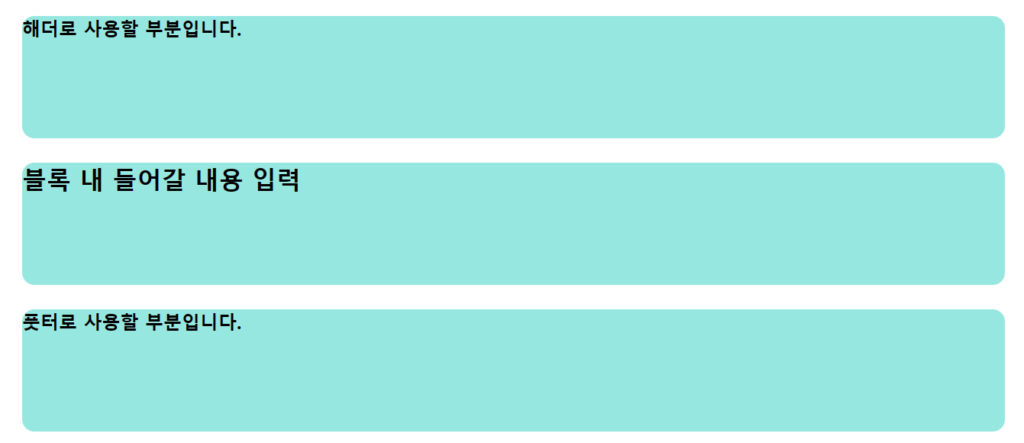
<div style="height: 10rem; background-color: #97E7E1; border-radius: 1rem; margin: 2rem">
해더로 사용할 부분입니다.
</div>
footer.html
<div style="height: 10rem; background-color: #97E7E1; border-radius: 1rem; margin: 2rem">
풋터로 사용할 부분입니다.
</div>
결과 화면
extend

extend 태그는 다른 템플릿의 레이아웃 역할을 하는 기본 템플릿을 생성하는 데 사용됩니다.
머리글, 바닥글, 탐색 표시줄 등 웹사이트 레이아웃의 공통 요소가 포함된 기본 템플릿(예: base.html)을 만듭니다.
다른 템플릿에서는 extend 태그를 사용하여 기본 템플릿의 구조와 레이아웃을 상속합니다. (기본이 템플릿(base.html)을 상속해서 사용한다는 의미가 가장 와닿습니다)
이러한 템플릿 내에서 각 페이지에 고유한 특정 콘텐츠를 정의합니다.
이를 통해 여러 페이지에 동일한 레이아웃을 재사용하여 웹사이트 전체에서 일관성을 유지할 수 있습니다.
extend를 사용하기 위해 base.html에 block 설정을 해줍니다.
block의 위치는 상속 받아서 변경하고 싶은 위치에 작성합니다.
{% block <block name>%}, {% endblock <block name> %} 형식으로 입력해줍니다.
block name을 입력해야 여러개의 block을 사용하는 경우 이를 구분할 수 있습니다.
base.html
<!DOCTYPE html>
<html lang="en">
{% include 'head.html' %}
<body>
    {% include 'header.html' %}

    {% block content %}
    {% endblock content%}

    {% include 'footer.html' %}
</body>
</html>
templates 하위에 app이름의 디렉토리를 다시 만들어 줍니다.
번거롭게 새로운 하위 디렉토리를 만드는 이유는 추후 views.py에서의 코드 가독성을 높이기 위함입니다.
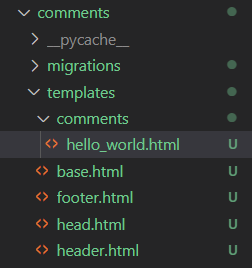
hellow_world.html을 변경해줍니다.
{% extends 'base.html' %} 를 맨 상단에 입력하여 base.html 내용을 상속해서 가져옵니다.
{% block content %} … {% endblock content %} 사이에는 base.html에서 동일하게 block을 설정했던 구역에 작성하고 싶은 내용을 작성해줍니다.
extends 태그에는 따옴표를 입력하고 block 태그에는 따옴표가 없음에 유의합니다.
hello_world.html
{% extends 'base.html' %}

{% block content %}
<div style="height: 10rem; background-color: #97E7E1; border-radius: 1rem; margin: 2rem">
    <h1>블록 내 들어갈 내용 입력</h1>
</div>

{% endblock content %}
views.py 코드에서 라우팅 경로를 방금 만든 html로 아래와 같이 변경해줍니다.
views.py
from django.shortcuts import render
from django.http import HttpResponse

# Create your views here.
def index(request):
    return render(request, 'comments/hello_world.html')
python manage.py runserver 를 통해서 템플릿 레이아웃이 제대로 구성되었는지 확인해 줍니다.
여러 app간 공유하는 templates 만들기
바로 직전까지는 app내에서 templates를 만들어 html 코드의 재사용성을 늘렸습니다. 하지만 프로젝트는 기능 단위로 app을 만드는데, app들 사이에서도 공유되는 html 코드들이 있을 것입니다.
때문에 모든 app들 사이에서 공유되는 templates를 만들면 좋을 것 같습니다.

templates 디렉토리를 프로젝트 디렉토리 위치에 생성한 뒤, 골격이 되는 base.html과 head.html을 templates 디렉토리로 옮깁니다.

settings.py에서 template 파일들을 찾을 때, 전역의 위치에서 찾을 수 있도록 알려줘야 합니다.
settings.py의 기존 templates 변수는 다음과 같이 입력되어 있습니다.
TEMPLATES = [
    {
        'BACKEND': 'django.template.backends.django.DjangoTemplates',
        'DIRS': [],
        'APP_DIRS': True,
        'OPTIONS': {
            'context_processors': [
                'django.template.context_processors.debug',
                'django.template.context_processors.request',
                'django.contrib.auth.context_processors.auth',
                'django.contrib.messages.context_processors.messages',
            ],
        },
    },
]
여기에서 APPS_DIRS키 값이 True 이기 때문에 각 app 하위의 templates 디렉토리를 찾을 수 있던 건데요.
DIRS 키 값에 새로 만든 templates 디렉토리의 위치를 알려줘야 app 하위 디렉토리 뿐만 아니라 새로 만든 위치의 templates도 장고가 뒤질 수 있게 됩니다.
DIRS키 값에 value를 다음과 같이 변경 합니다. [BASE_DIR / "templates"]
TEMPLATES = [
    {
        'BACKEND': 'django.template.backends.django.DjangoTemplates',
        'DIRS': [BASE_DIR / "templates"],
        'APP_DIRS': True,
        'OPTIONS': {
            'context_processors': [
                'django.template.context_processors.debug',
                'django.template.context_processors.request',
                'django.contrib.auth.context_processors.auth',
                'django.contrib.messages.context_processors.messages',
            ],
        },
    },
]
마치며
CRUD를 들어가기도 전에 살짝 지치네요…ㅎㅎ 빨리 CRUD 구성하는 법을 공부해서 정리해보겠습니다.